This guide explains how to manage store in the Mercur Vendor Panel.
Store Set Up
You can set up a store in Mercur in three ways:
- Admin Invitation: The admin invites you to join the platform and set up your first store.
- Vendor Request: You create a new store in your panel, which the admin then confirms.
- Vendor Self-Registration. When enabled, you can apply to join the platform through the storefront or other available entry points.
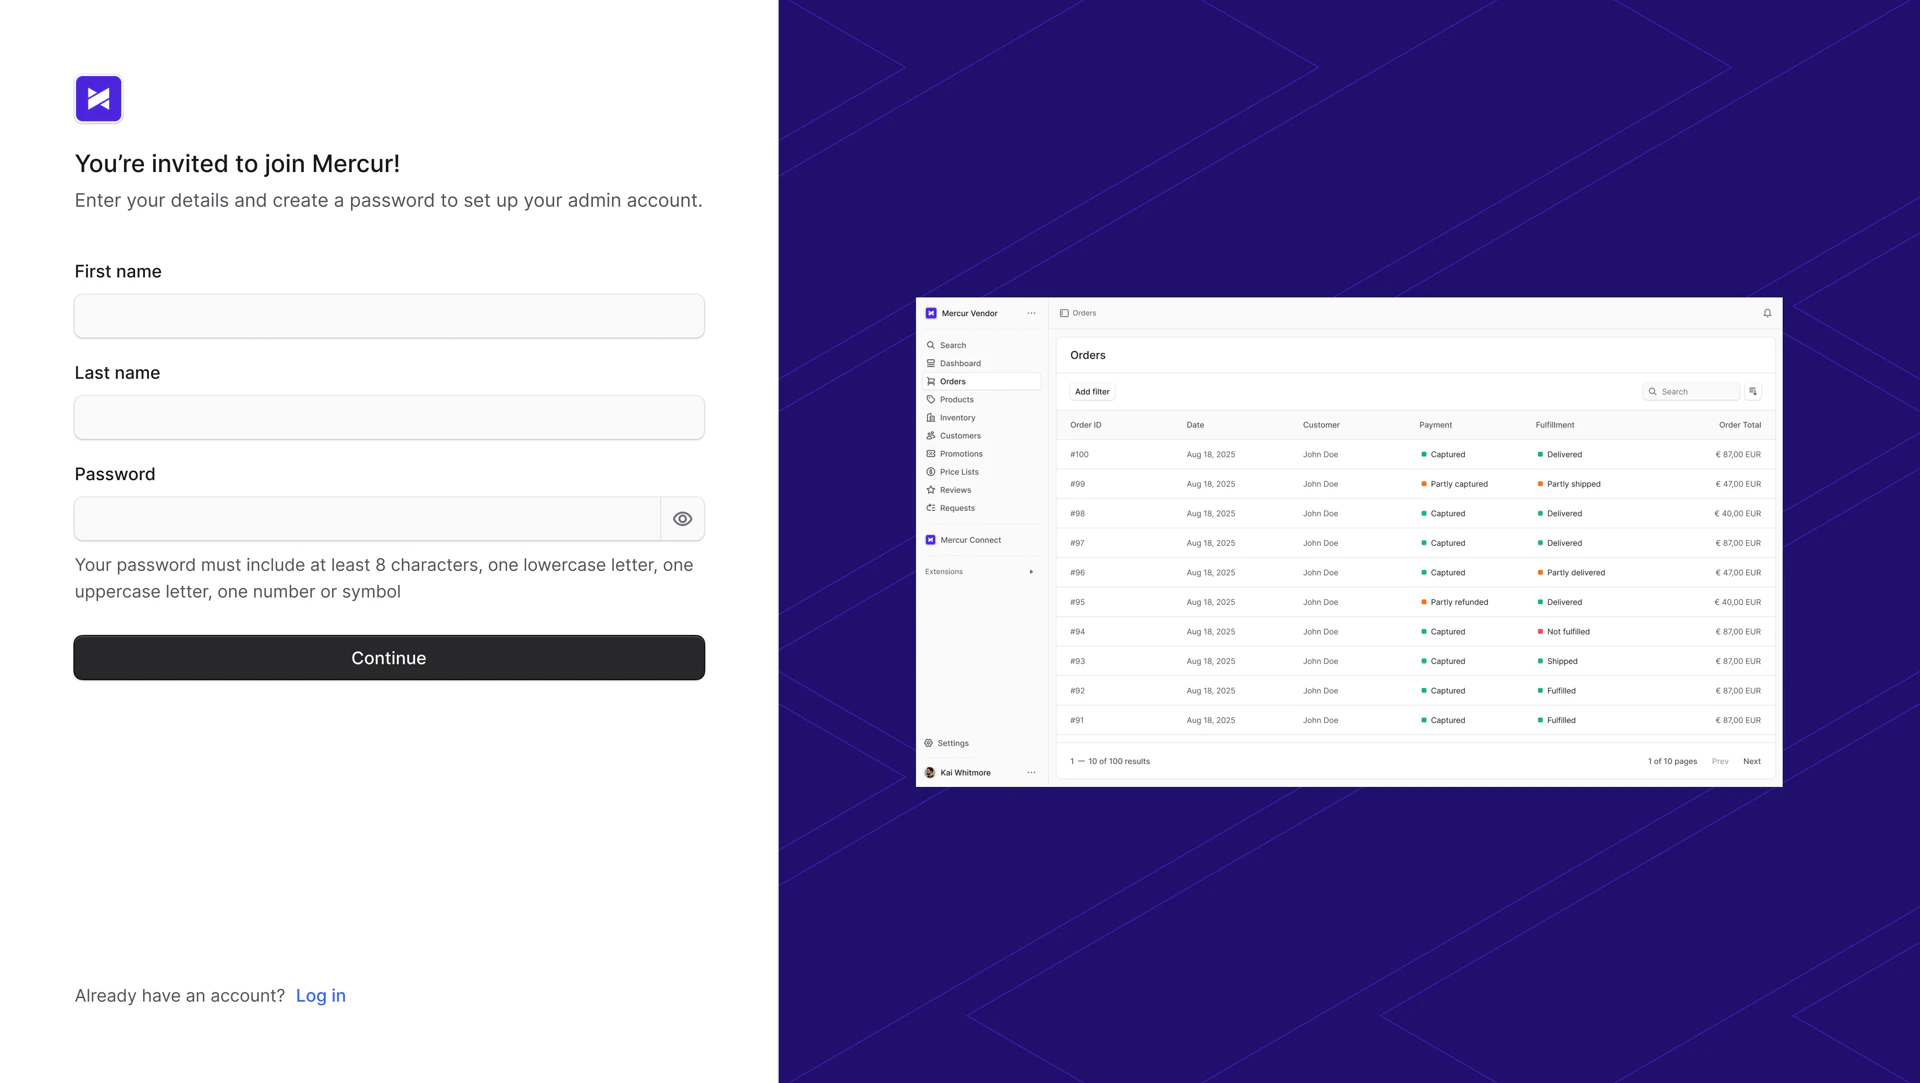
Admin Invitation
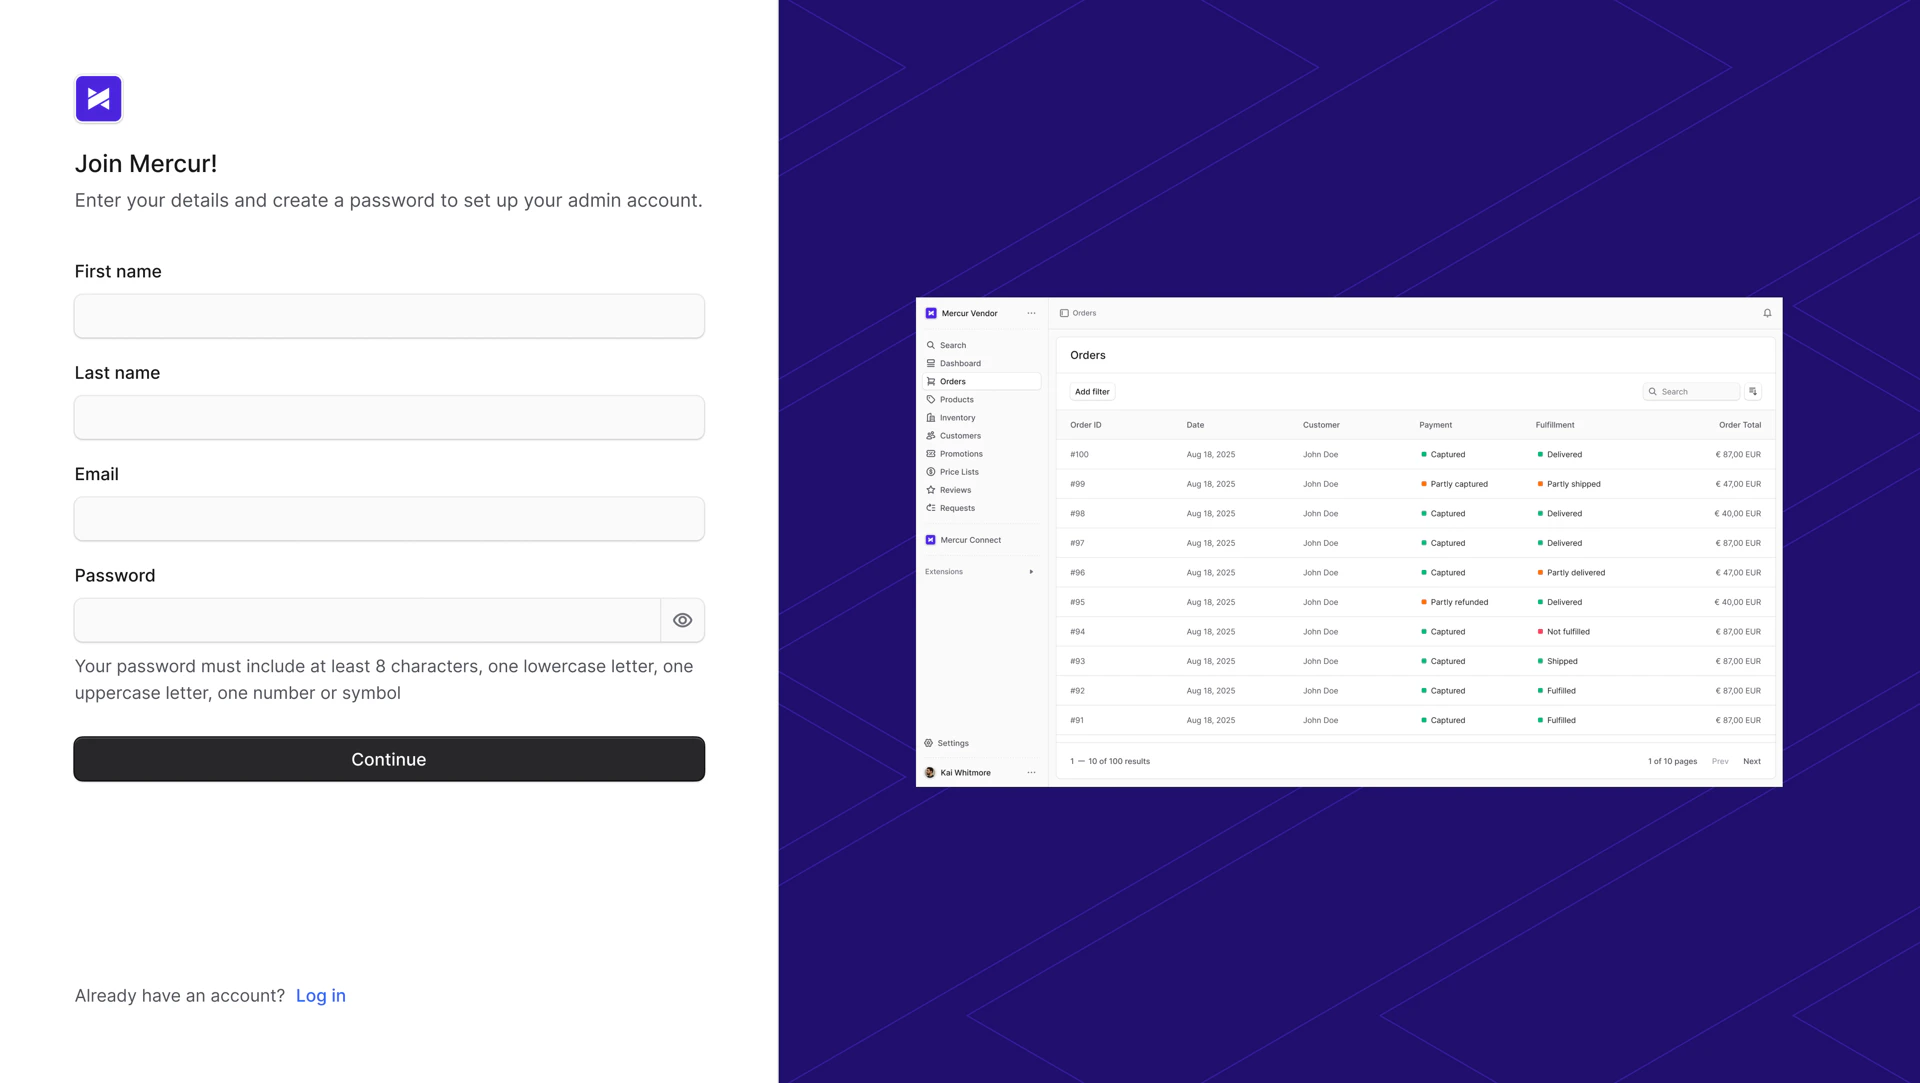
Once the admin creates the store and invites you, you receive an email with a link to join as the store’s admin. After accepting the invitation, you are redirected to the setup page, where you enter your details and set a password. Once completed, click “Continue” to start onboarding.
 The onboarding setup is customizable depending on marketplace needs and may include:
- Store Details
- Address
- Company Details
- Payment Details
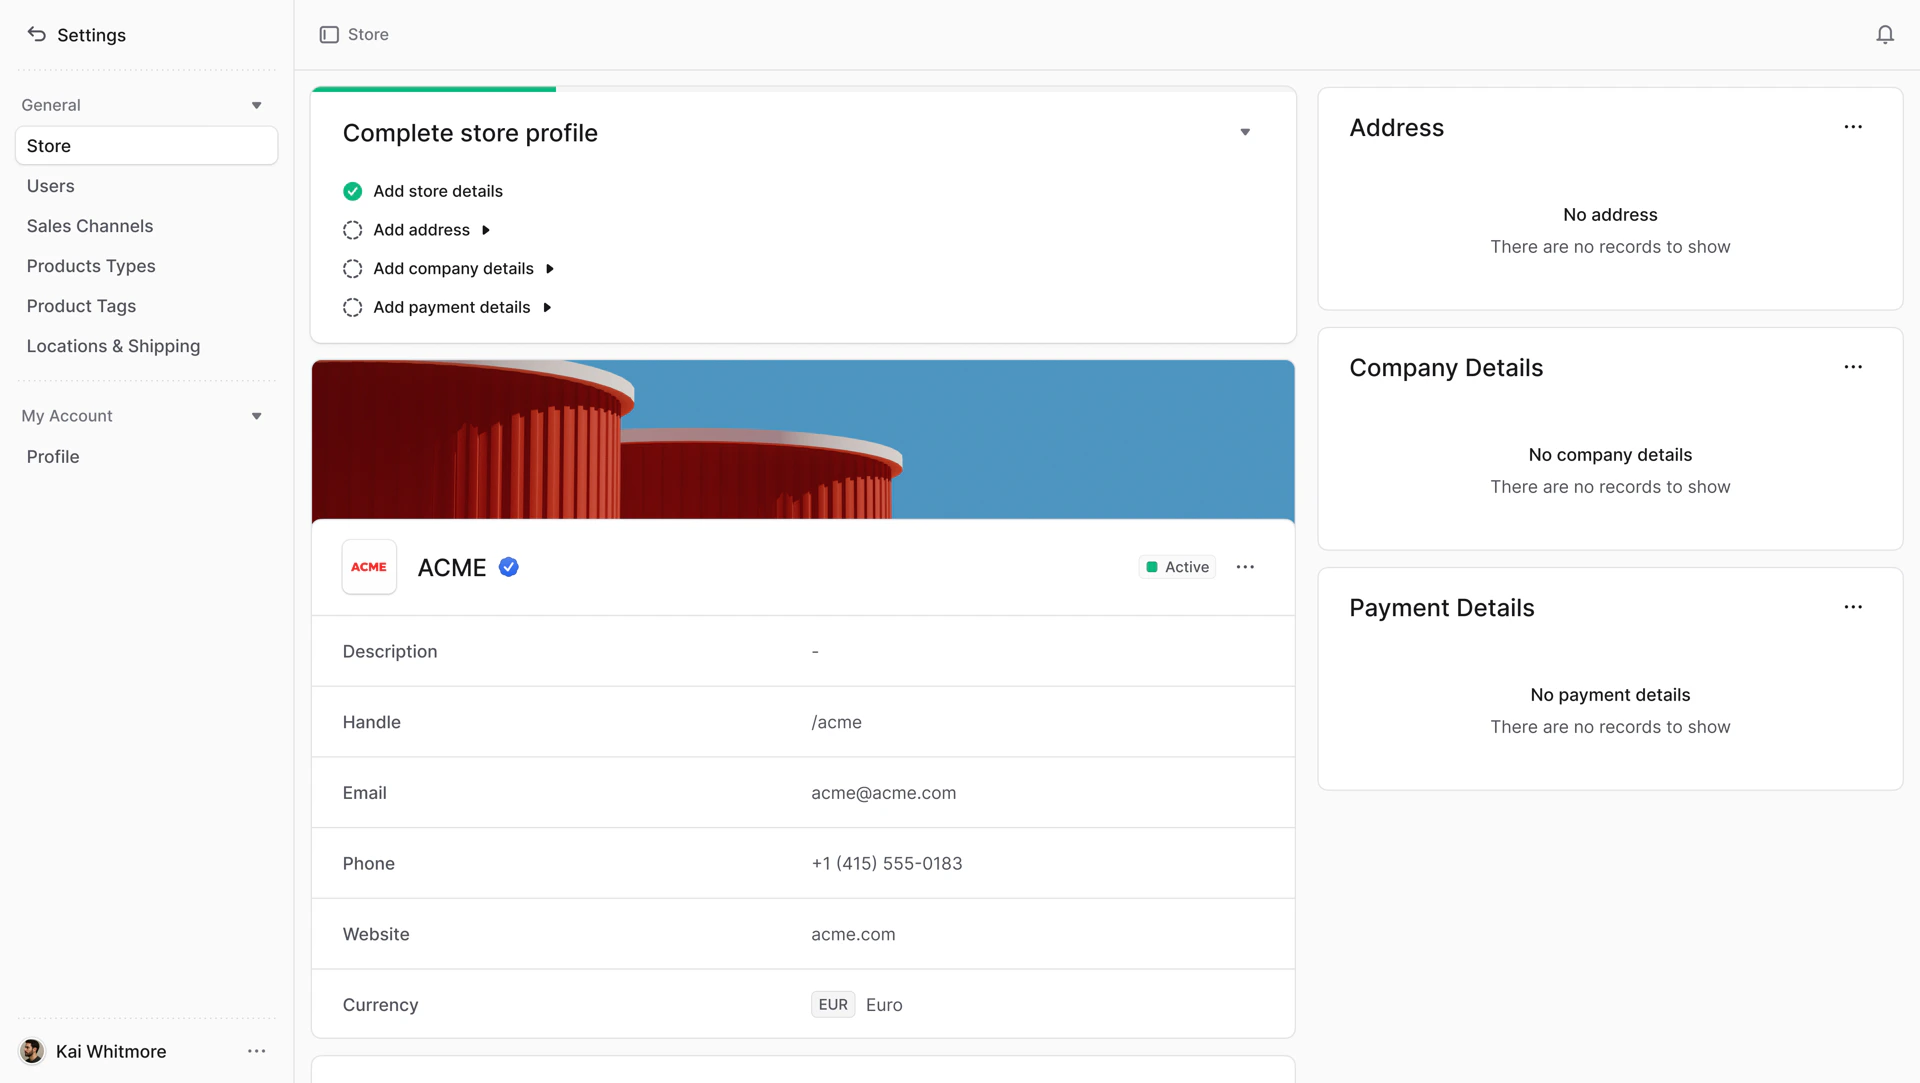
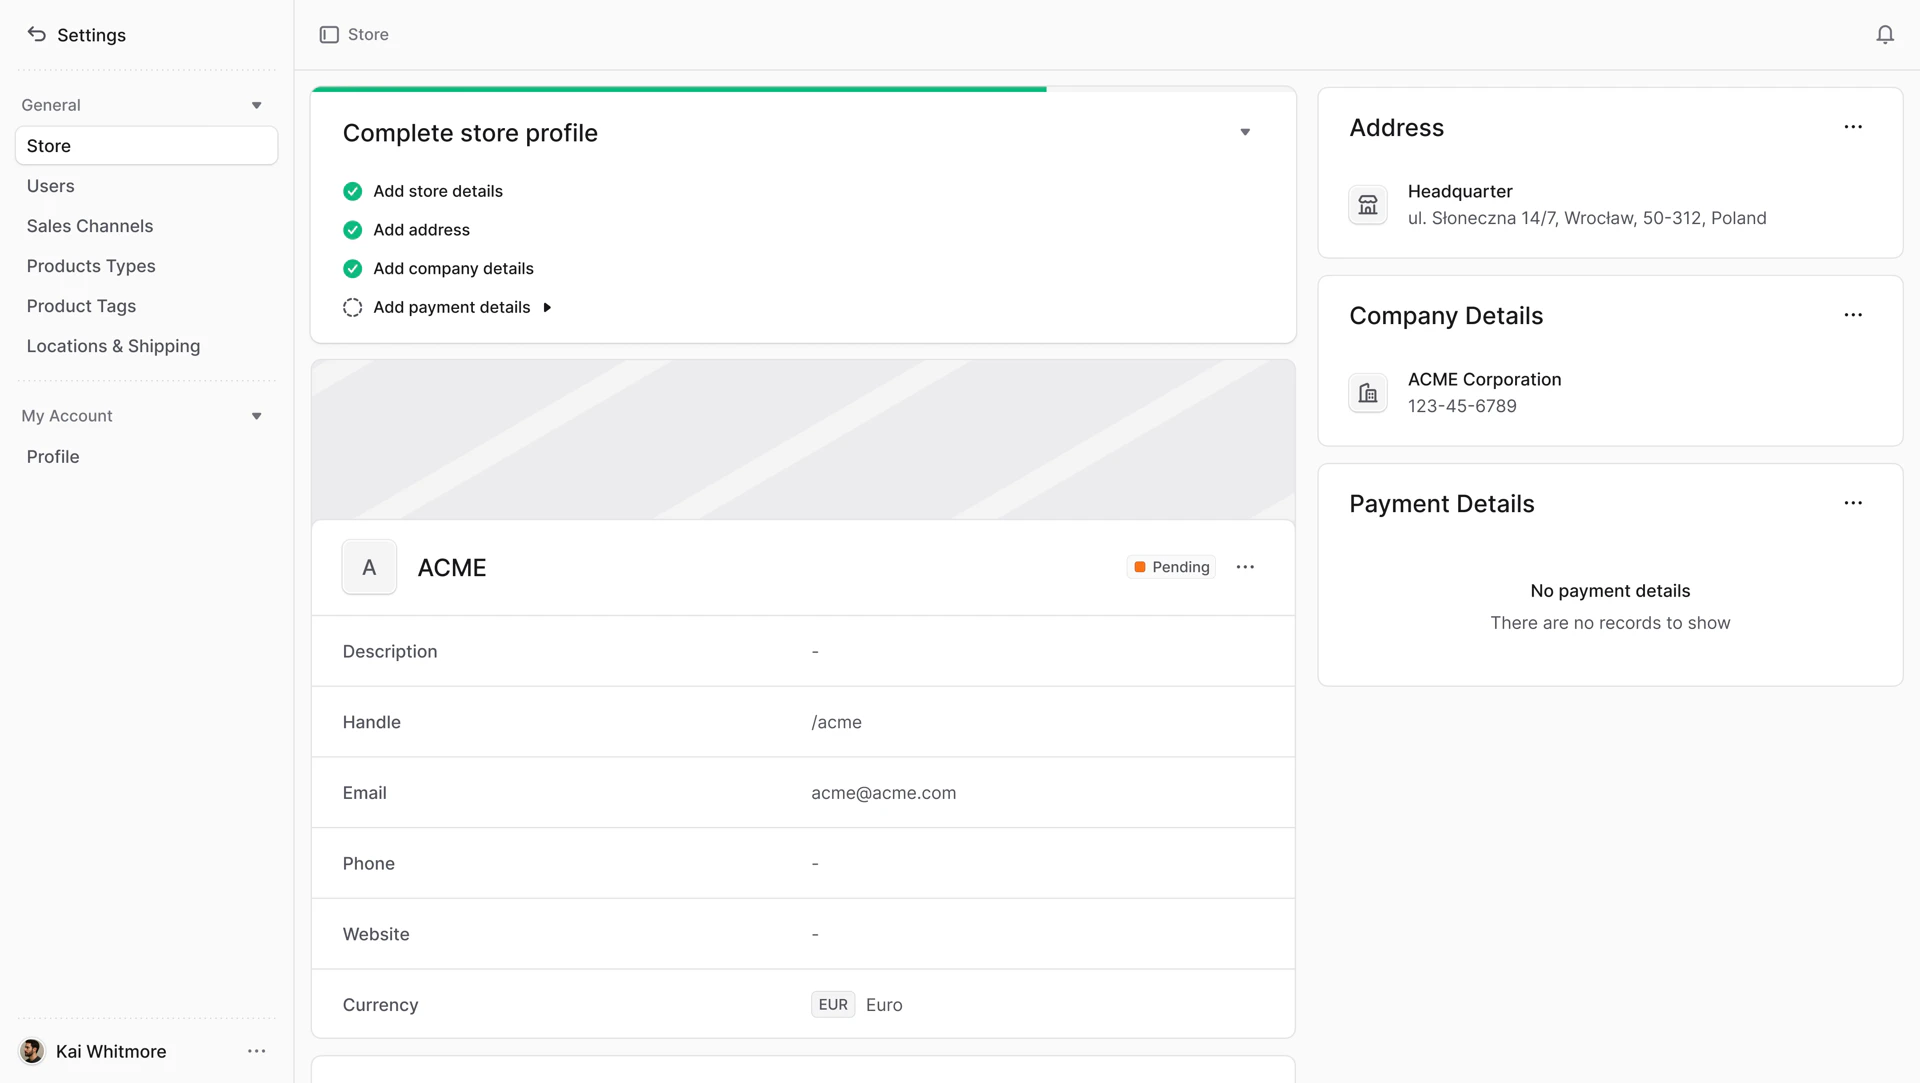
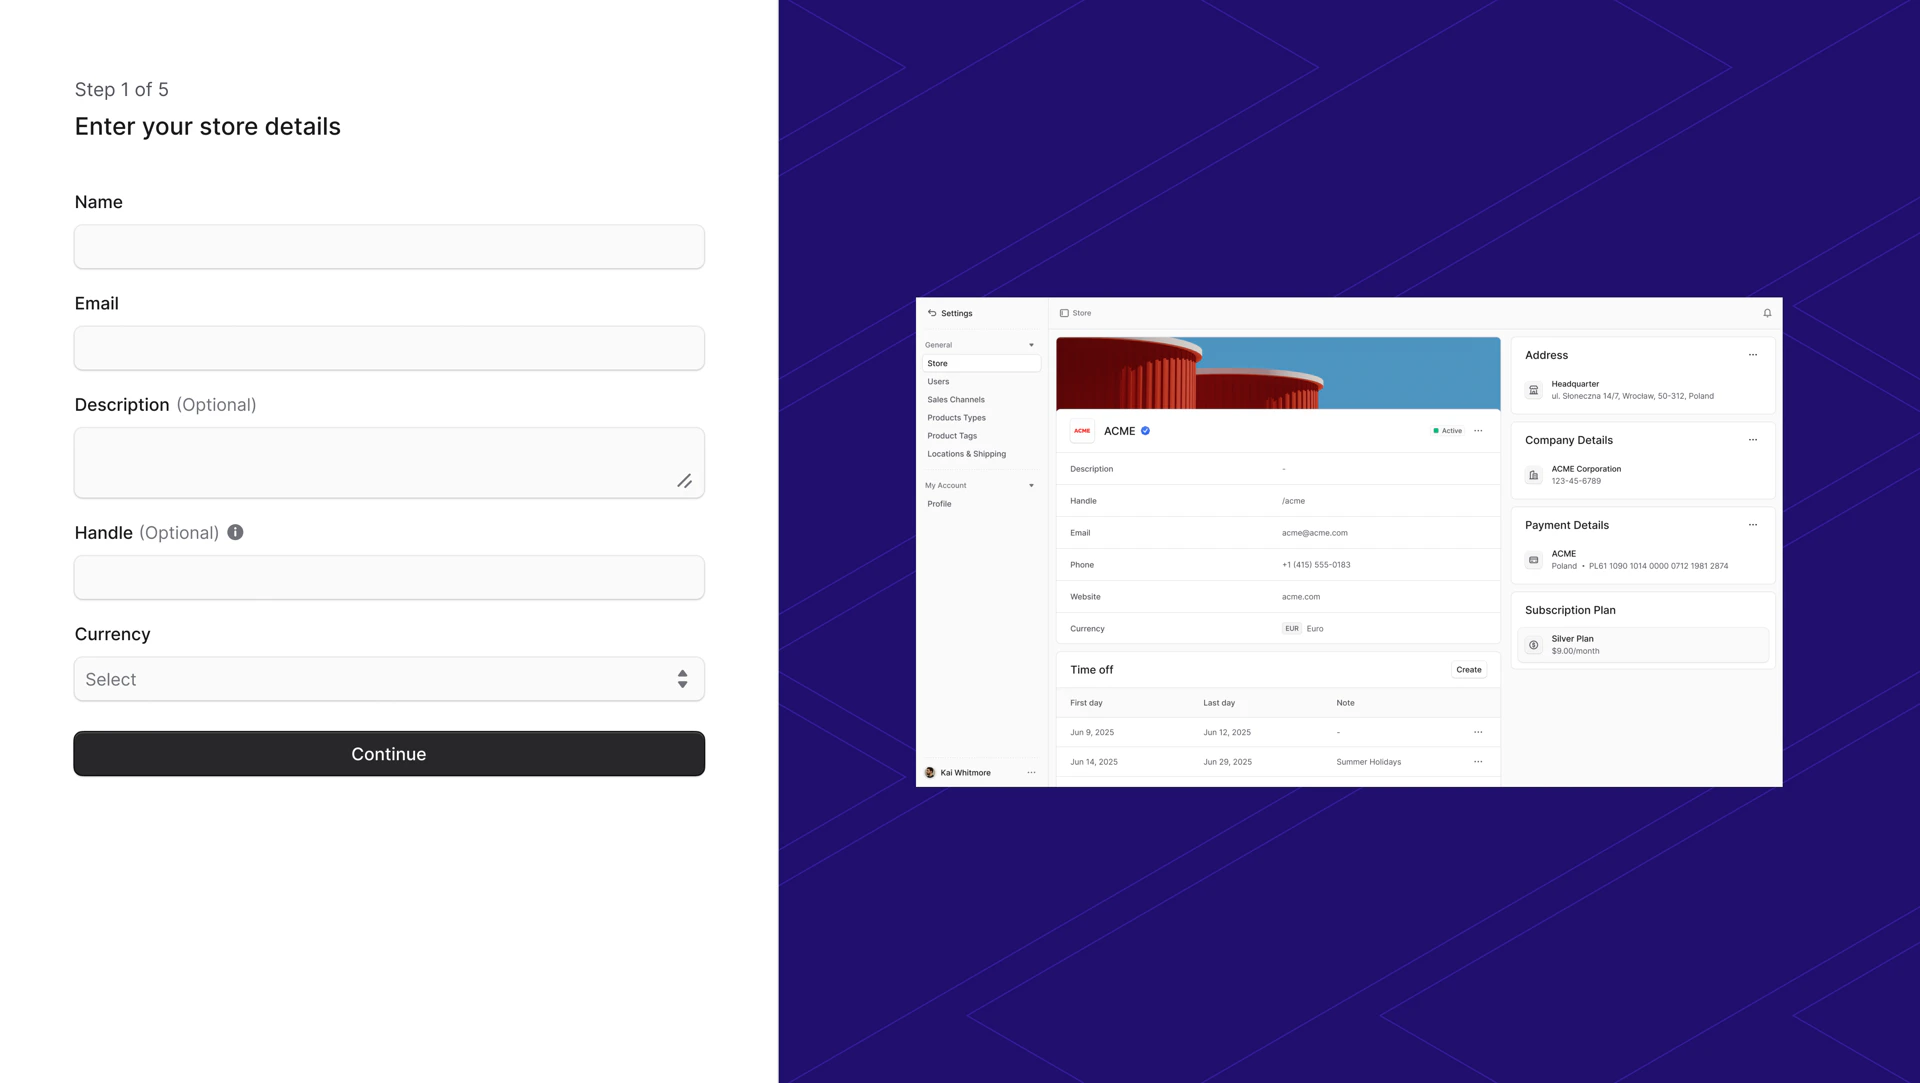 Depending on the marketplace configuration, you need to complete all required steps during onboarding or later in the store profile. The “Complete profile” block shows any missing information required by the marketplace. Once all required information is added, the block disappears.
Vendor Request
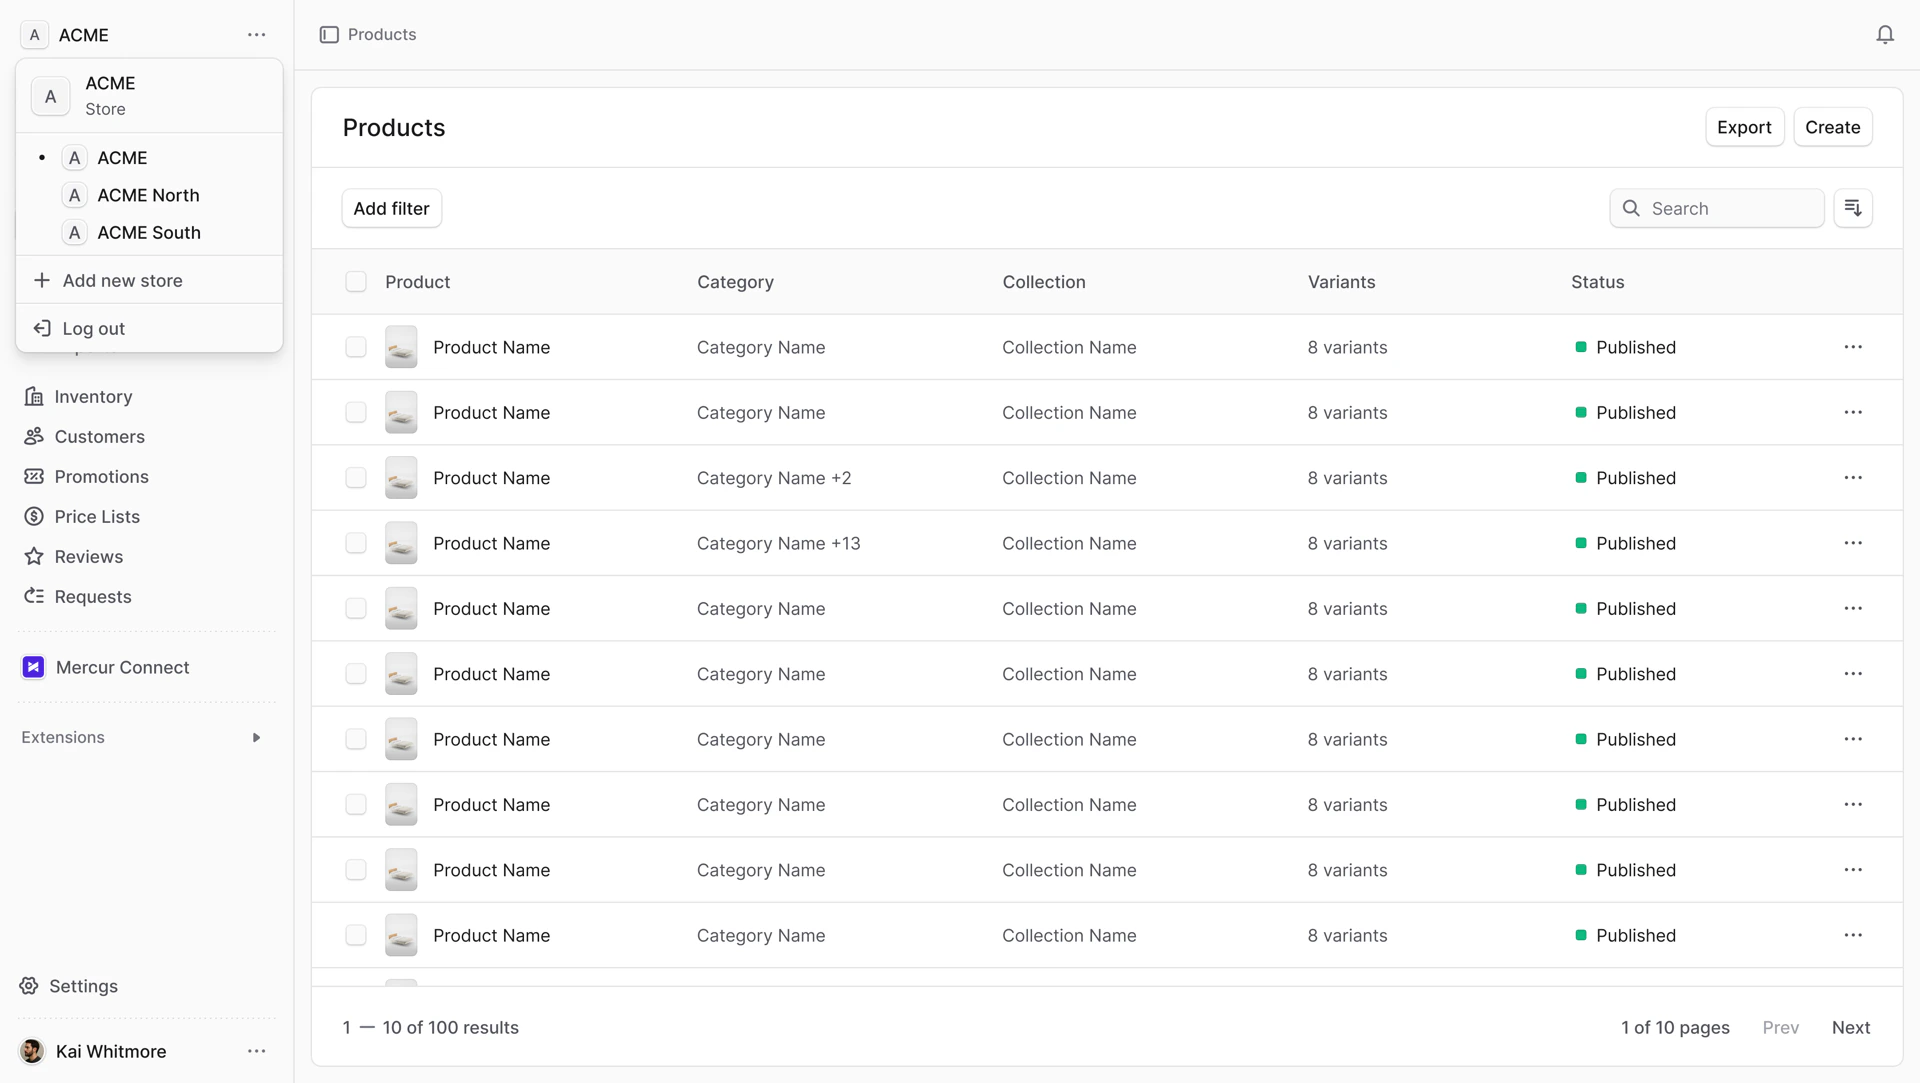
A vendor can have multiple stores in Mercur. If you already have one, you can create another.
To create a store:
- Click the store name in the upper left corner.
- A menu appears showing your available stores, with the active one selected.
- Click the “Add new store” button.
- This opens a new page for store setup. The setup is customizable based on marketplace needs and may include:
- Store Details
- Address
- Company Details
- Payment Details
After creating the store, you are redirected to the store details page with a “Pending” status.
Depending on the marketplace setup, a “Complete profile” block may appear showing any missing information required by the marketplace. Once all required information is added, the block disappears.
Vendor Self-Registration
When the marketplace admin enables self-registration, you can apply to join the platform through the storefront or other entry points. You are then redirected to the registration page to set up an admin account and create the first store.
After creating the store, you are redirected to the store details page with a “Pending” status.
Depending on the marketplace setup, a “Complete profile” block may appear showing any missing information required by the marketplace. Once all required information is added, the block disappears.
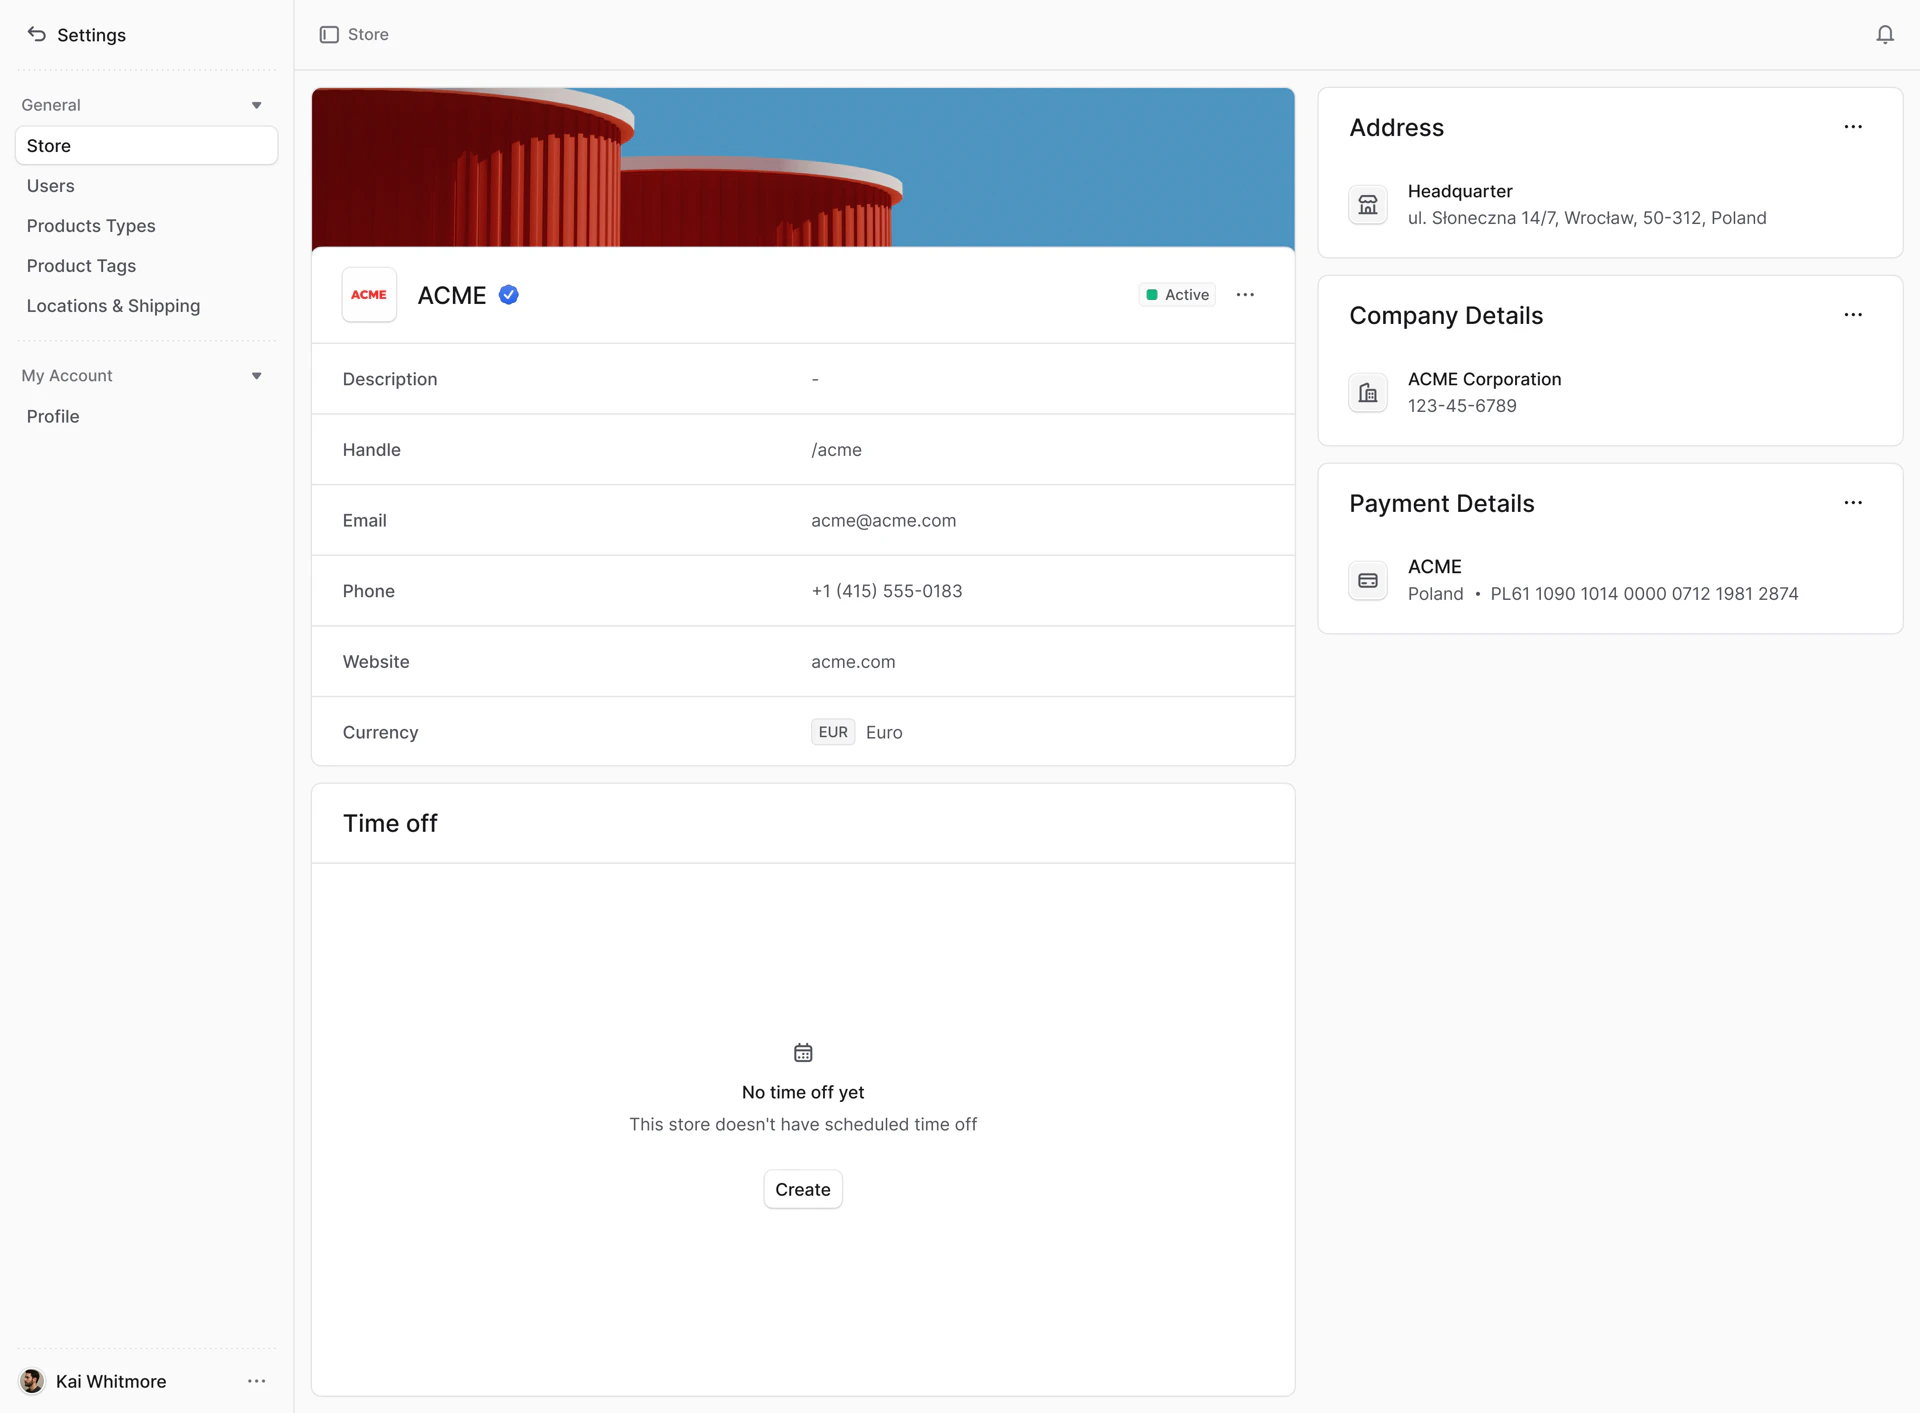
Store Details
To view store details:
- Go to “Settings” in the sidebar.
- Go to “Store” in the sidebar.
This opens the store details page. Here, you can view and edit store details, address, company details, payment details, time off.
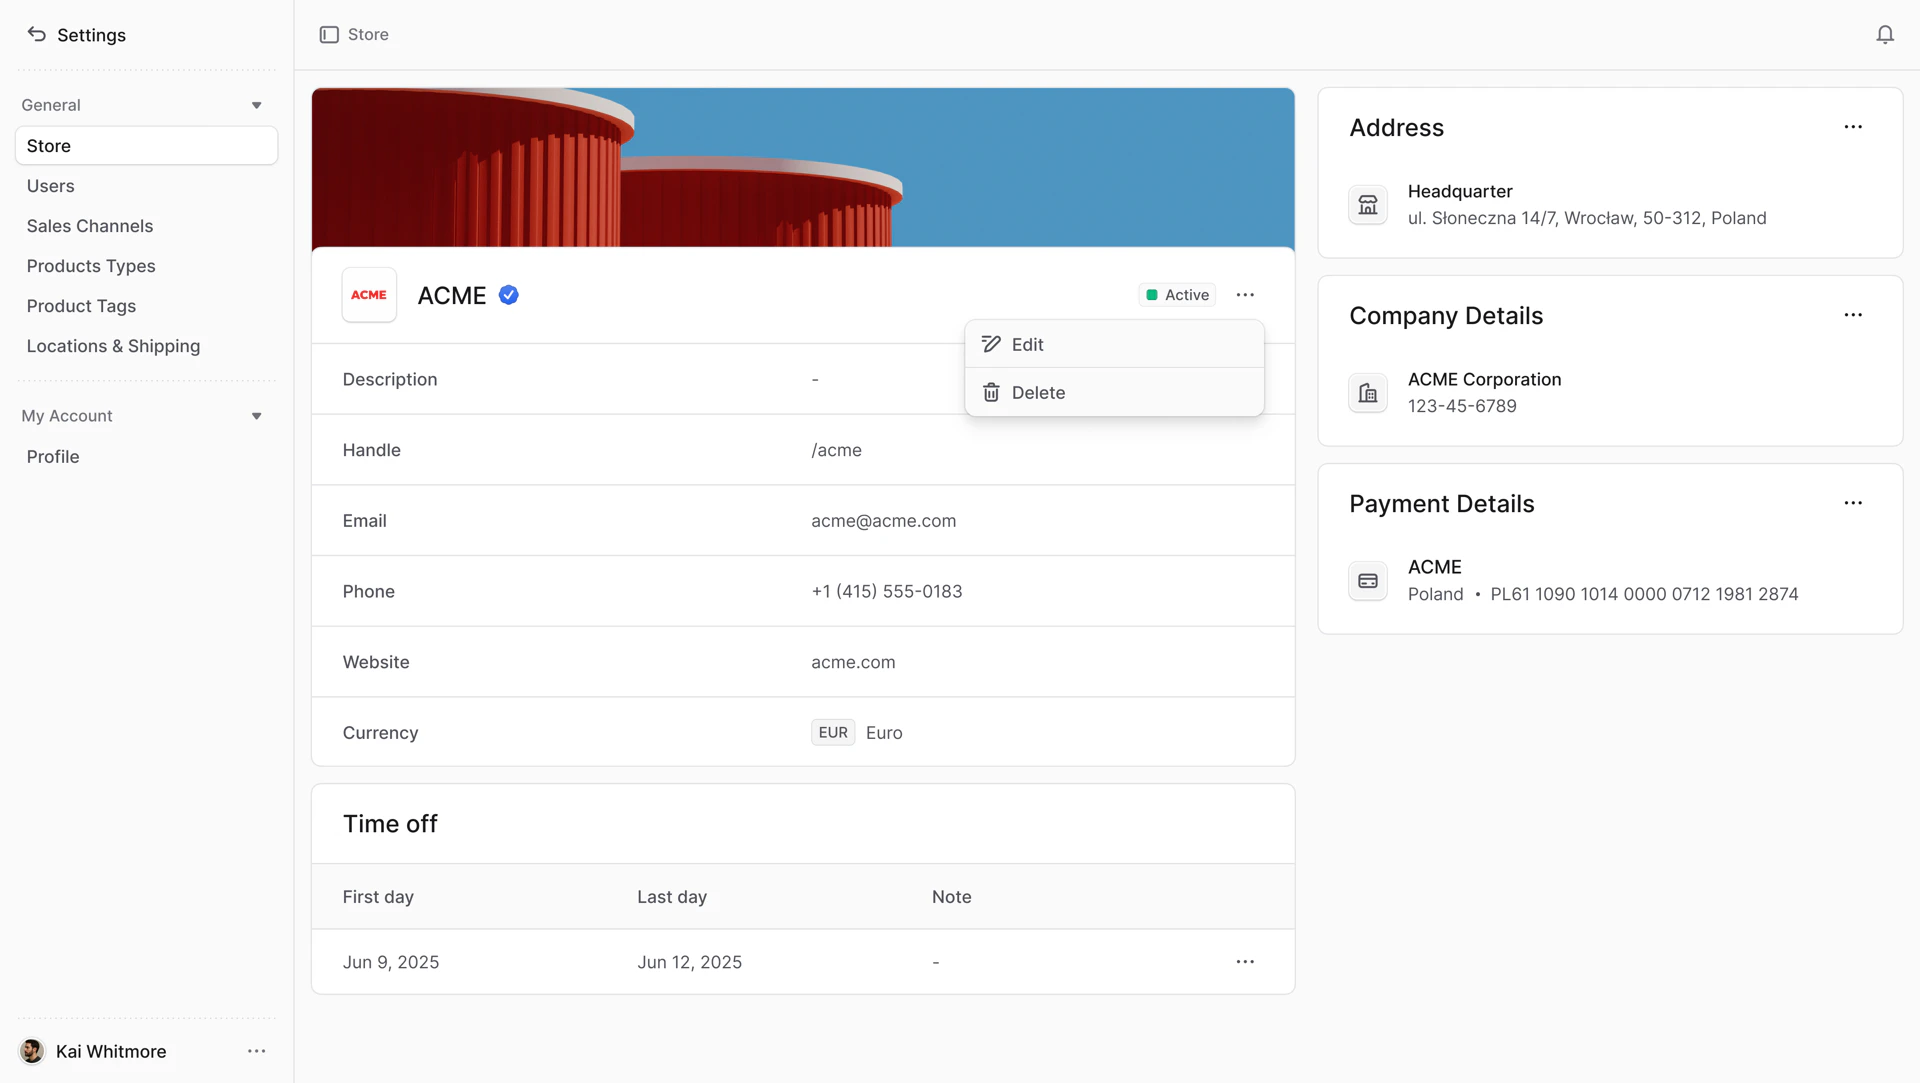
Edit Store Details
To edit store details:
- Go to “Settings” in the sidebar.
- Go to “Store” in the sidebar.
- Click the icon in the section’s header.
- Choose “Edit” from the dropdown.
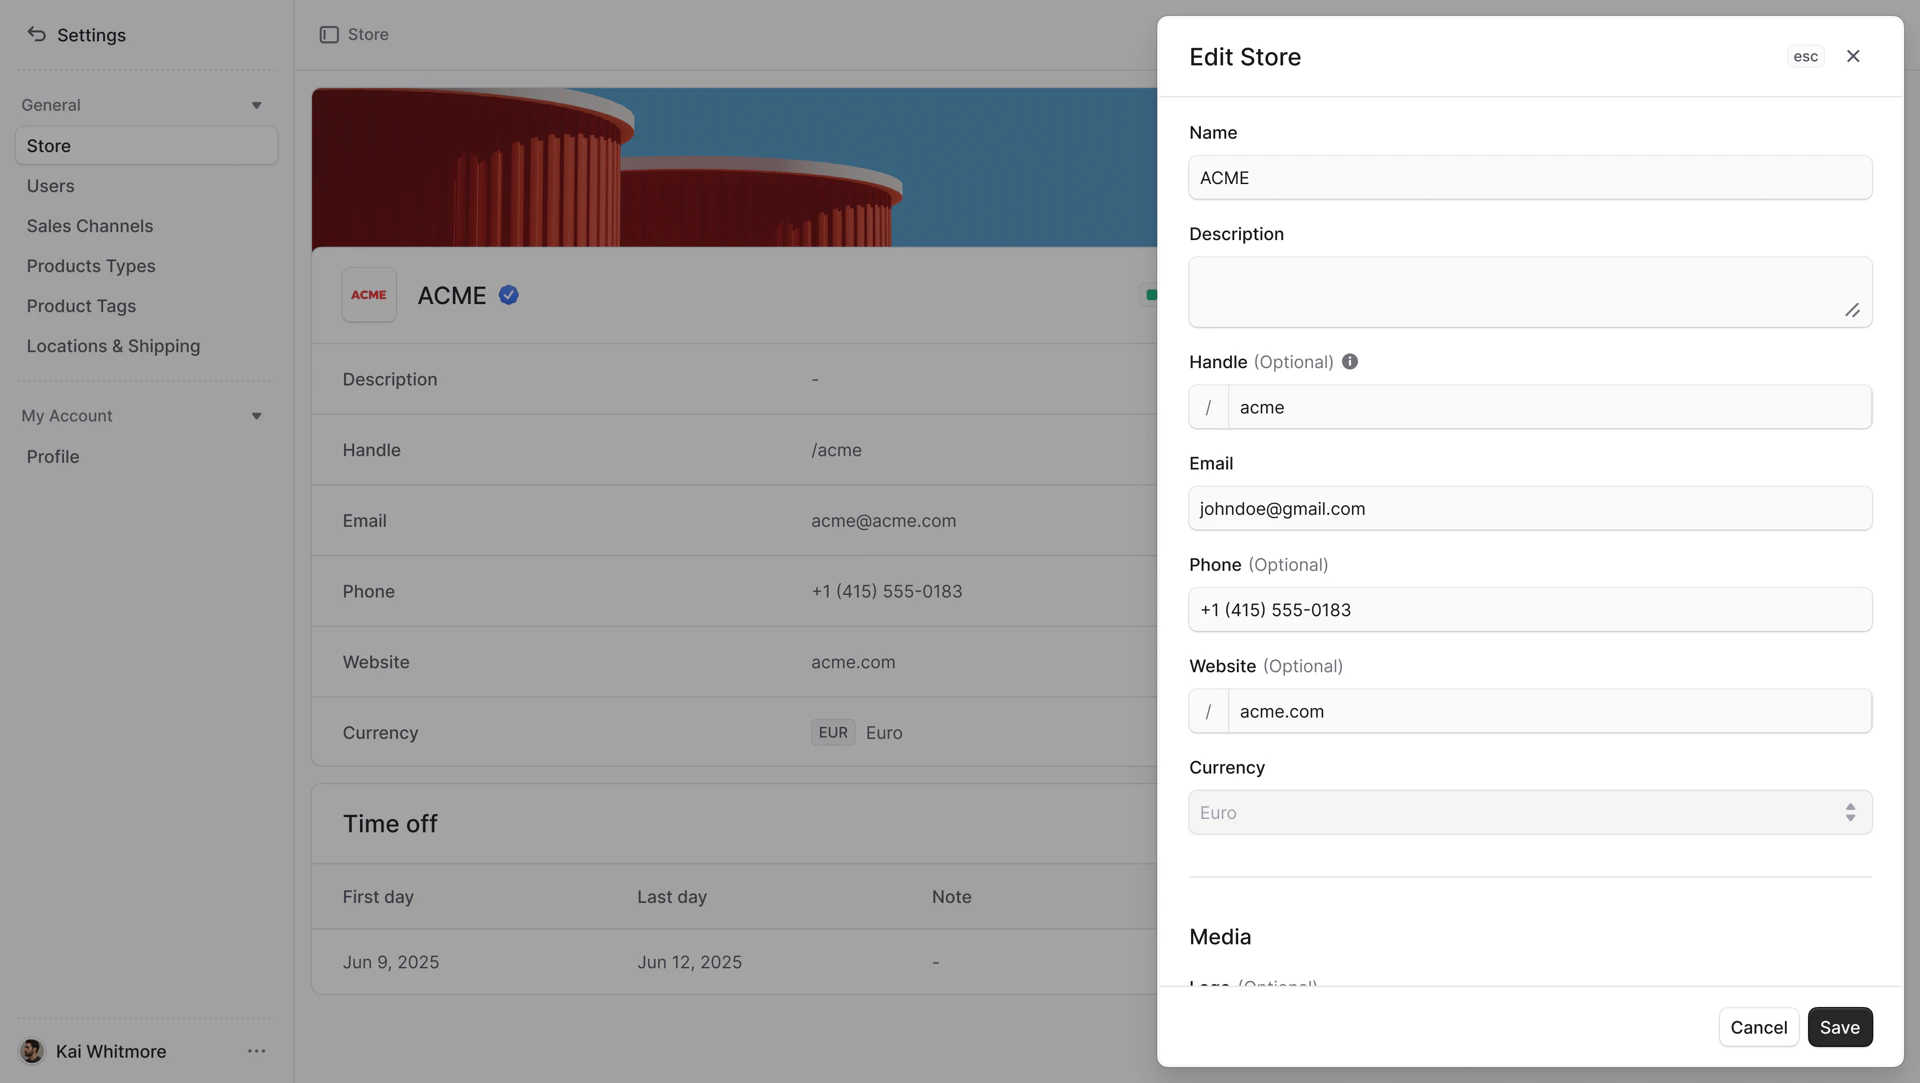
- In the side window that opens, you can edit the store:
- Name
- Description
- Handle
- Email
- Phone
- Website
- Media. You can add logo and banner. This media will be visible on the storefront.
- Once you’re done, click the “Save” button.
A vendor can have only one currency per store. Once set, the vendor cannot change the currency.
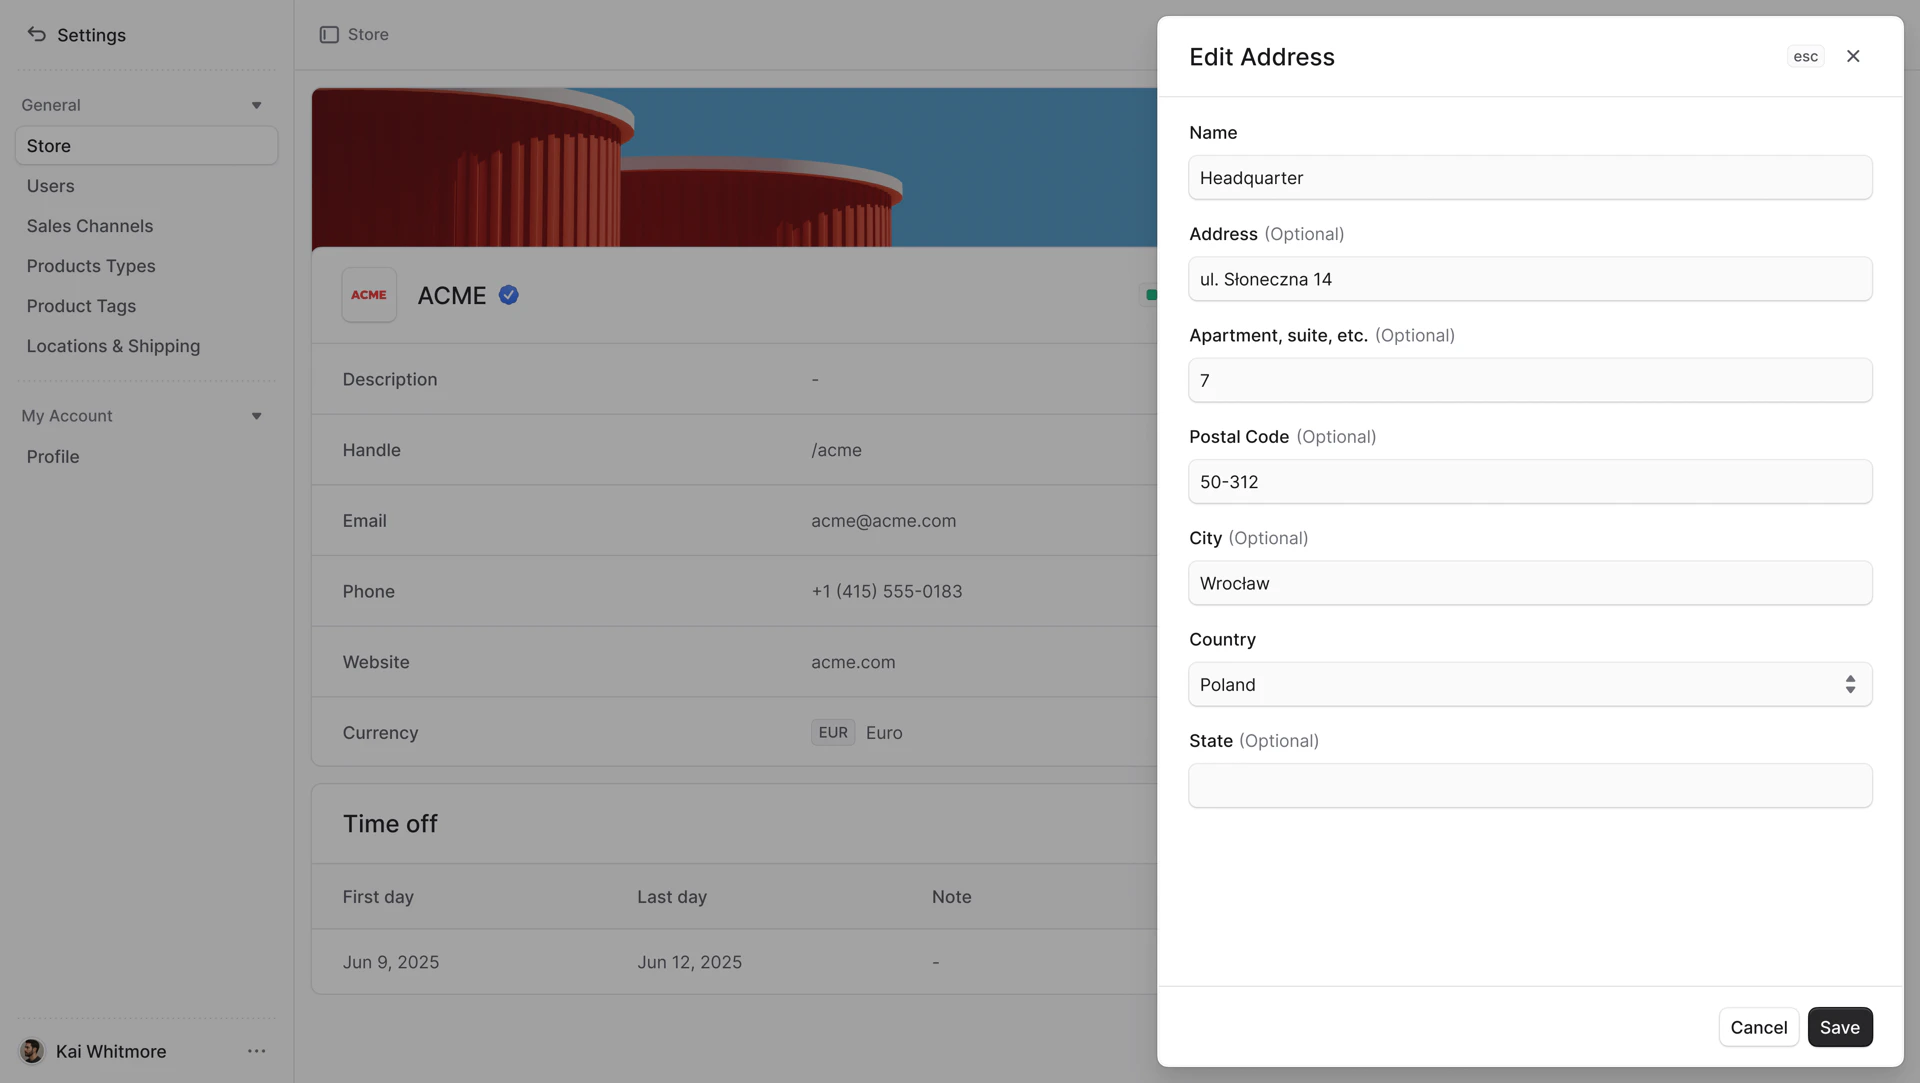
Edit Store Address
To edit store address:
- Go to “Settings” in the sidebar.
- Go to “Store” in the sidebar.
- Click the icon in the “Address” header.
- Choose “Edit” from the dropdown.
- In the side window that opens, you can edit:
- Name
- Address
- Apartment, suite, etc.
- Postal Code
- City
- Country
- State
- Once you’re done, click the “Save” button.
Edit Store Company Details
To edit company details:
- Go to “Settings” in the sidebar.
- Go to “Store” in the sidebar.
- Click the icon in the “Company Details” header.
- Choose “Edit” from the dropdown.
- In the side window that opens, you can edit:
- Company
- Registration number
- Tax ID
- Once you’re done, click the “Save” button.

Edit Store Payment Details
To edit payment details:
- Go to “Settings” in the sidebar.
- Go to “Store” in the sidebar.
- Click the icon in the “Payment Details” header.
- Choose “Edit” from the dropdown.
- In the side window, you can edit payment details:
- For all countries except the United States, provide the following details based on your needs:
- Account name
- IBAN
- Account number
- SWIFT/BIC
- For United States:
- Account name
- Account number
- ACH routing number
- Once you’re done, click the “Save” button.

Time Off
In the “Time off” section, you can manage your store’s time off. It specifies when the store will be unavailable to receive orders. You can specify one time off period and add a note. During this period, the store’s products will not be visible on the storefront.
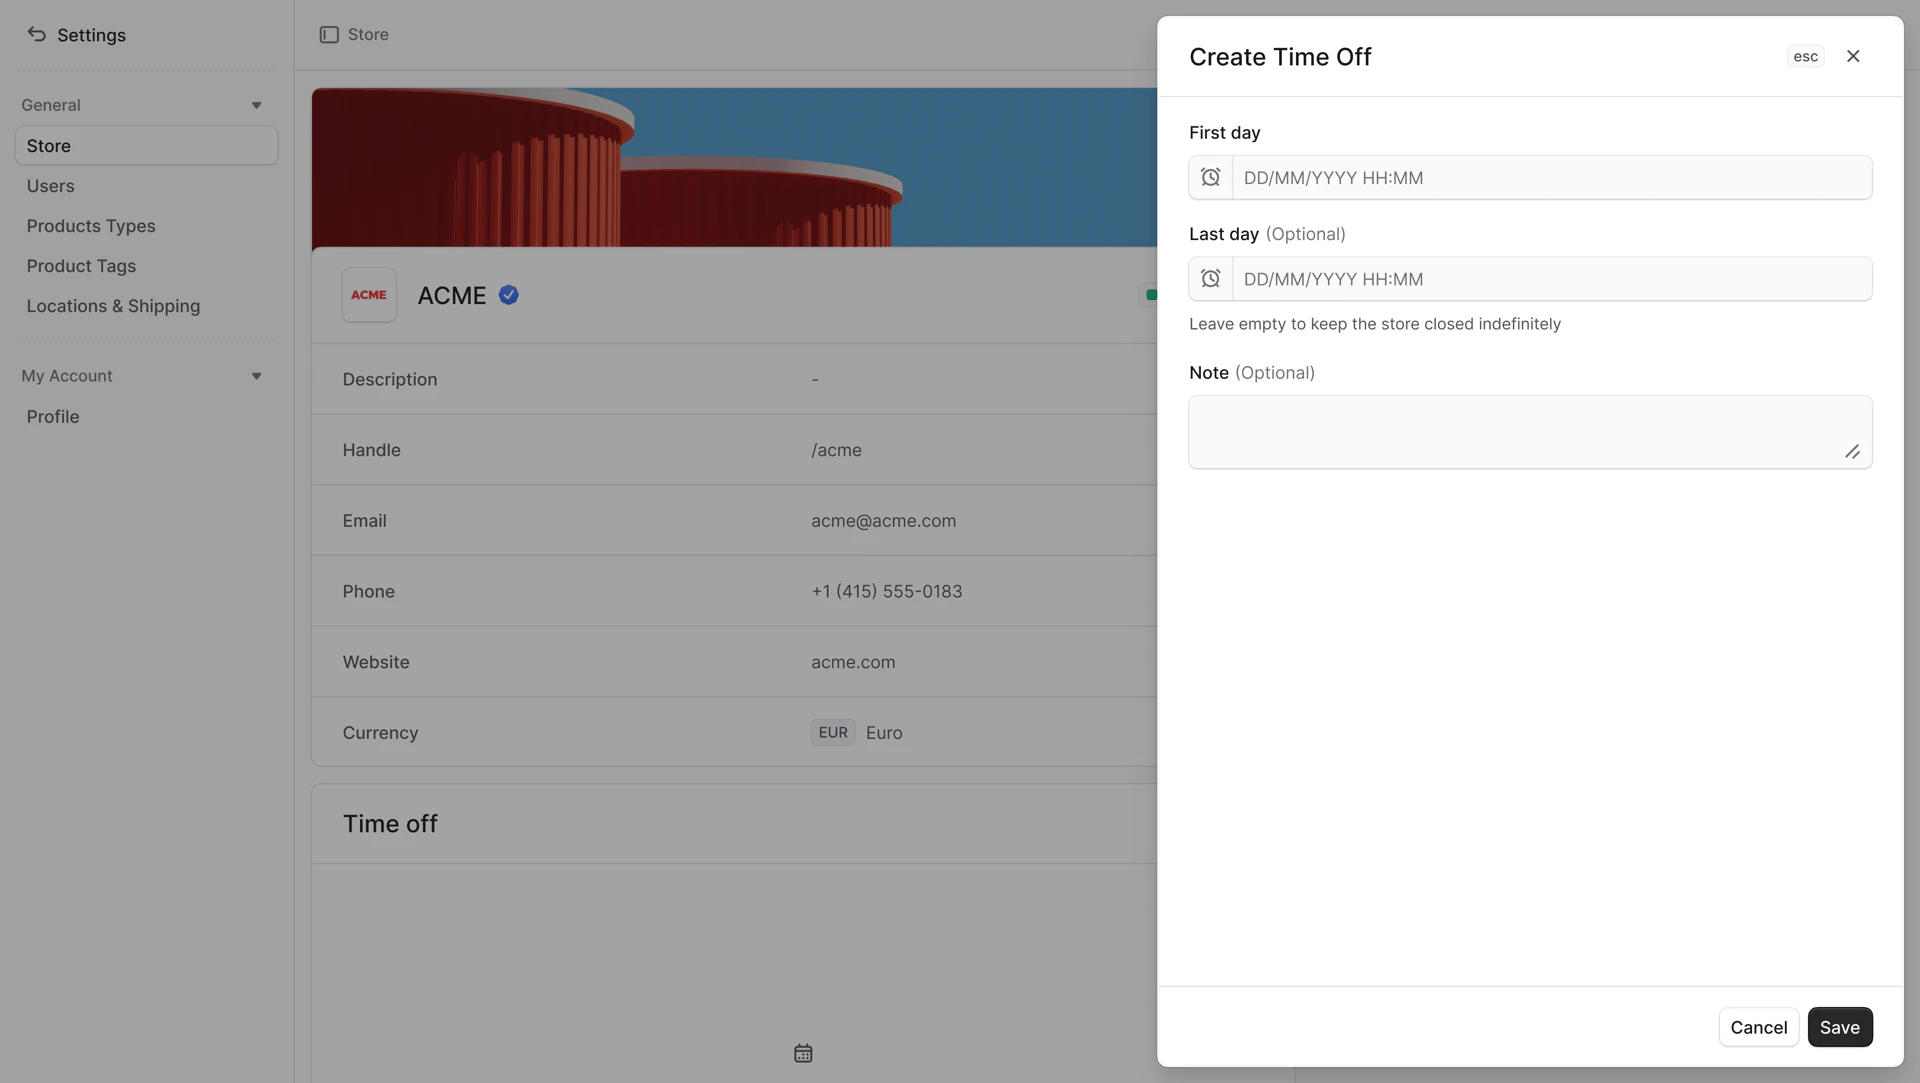
Create Time Off
To create a time off:
- Go to “Settings” in the sidebar.
- Go to “Store” in the sidebar.
- Click the “Create” button in the “Time off” section.
- In the side window, you can enter:
- First day
- Last day. If you leave this field empty, the store will be closed indefinitely.
- Note
- Once you’re done, click the “Save” button.
Once time off expires, it will disappear.
Edit Time Off
To edit a time off:
- Go to “Settings” in the sidebar.
- Go to “Store” in the sidebar.
- Click the icon in the time off row.
- Choose “Edit” from the dropdown.
- In the side window, you can edit:
- First day
- Last day. If you leave this field empty, the store will be closed indefinitely.
- Note
- Once you’re done, click the “Save” button.
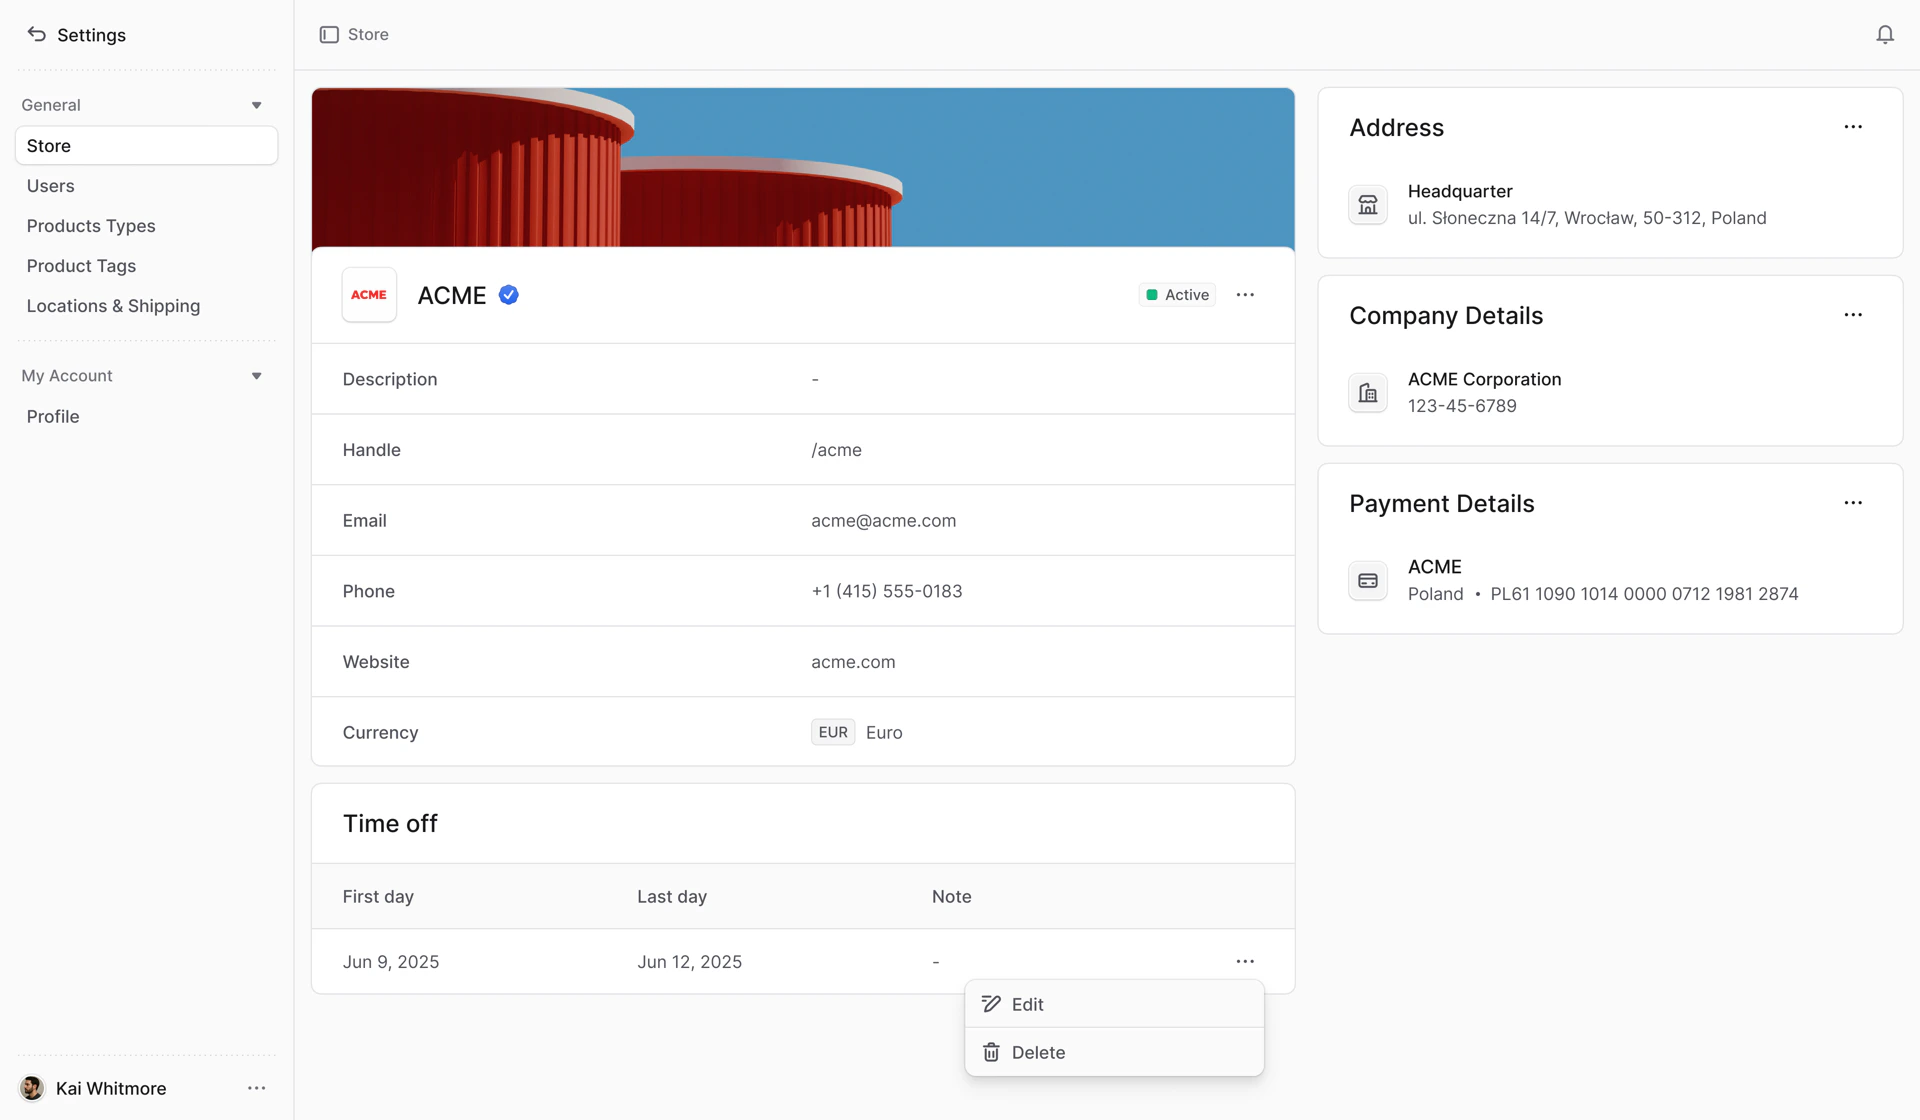
Delete Time Off
To delete a time off:
- Go to “Settings” in the sidebar.
- Go to “Store” in the sidebar.
- Click the icon in the time off row.
- Choose “Delete” from the dropdown.